
Use the Survey data extraction tool in the Map control toolbar to extract survey data into an XML file, or run a coordinate transformation.

Open survey data extraction panel
Select the Survey data extraction tool from the tool bar.

The Survey data extraction panel opens.

The Selection mode is set to Survey data extraction - Add specific survey plans by default.
Left-click in the Selection mode field to select other selection modes:- Survey data extraction - Area of interest (Polygon)
- Survey data extraction - Area of interest (Rectangle)
- Coordinate transformation – Add specific marks.
For details on how to run a coordinate transformation, see:
Coordinate transformation.


Changing selection mode will clear any previous selection you have made.
Add specific survey plans mode
Use the Add to survey data extraction icon to add registered or approved survey plans from:
- the parcel summary page
- the product list
- the multi-selection bucket
- the parcel info panel in the spatial map.

You can add surveys to the survey data extraction panel without having the panel open first. Select the Add to survey data extraction icon from any of the above locations to begin a new data extraction. The survey data extraction panel will open as the survey plan is added.
You can add up to 20 survey plans to the survey data extraction panel. The data associated with these plans can then be extracted.
Add survey plans to the survey data extraction panel from the spatial map
- Turn on the appropriate Survey Plan References layer.
- Select a survey plan reference on the spatial map. A pop-up information panel opens.
Select Add to survey data extraction in the pop-up information panel.

The survey plan is added to the survey data extraction panel.


You can also use the Multi-Select tools to select more than one survey reference at once.
See: Multi-select tools
- When you multi-select survey plan references they are added to the selection bucket at the bottom left of the spatial screen.
Select Add to survey data extraction to add these to the survey data extraction panel.


Although you can multi-select up to 1000 spatial items, you can only add a maximum of 20 survey plan references to the survey data extraction panel.
To remove surveys from the survey data extraction panel:
- select the grey X icon to the right of the survey reference, or
- select the red Clear selection icon (rubbish bin) to the right of the total survey plans to clear the whole list.

When you have added all your required survey plan references, choose your extract options and select Extract data.
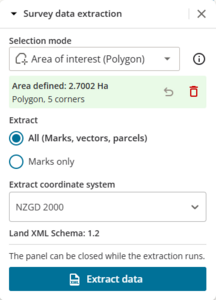
Area of interest (Polygon) mode
Use Area of interest (Polygon) mode to draw a polygon that defines an area containing the data you want to extract.
Only vectors, marks and parcels that fall wholly within the area defined will be extracted.
Select Area of interest (Polygon). Your cursor will gain a pink dot, indicating its ready to draw.

Create a polygon by clicking the shape you want. As you click and move the mouse, a pink polygon appears on the screen.

Complete the polygon by double-clicking the left mouse button. If the polygon has been successfully created the Survey data extraction panel expands to show the extract options:
- Extract type
- Extract Coordinate System
- Extract data button.
See Extract options


If you self-intersect while defining a polygon, the lines turn red and do not allow you to create a point while intersected. Move the mouse so your lines don’t intersect - when its pink again you can continue.

Clear selection
You can delete and redraw the polygon by selecting the Clear selection icon (rubbish bin) beside the Area defined label. This removes the polygon from the screen in preparation for a new polygon to be created.

If the area you define is too large, you will get an error. Clear selection and redraw the polygon to cover a smaller area.

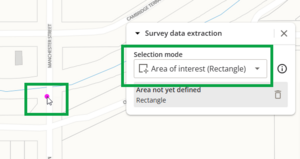
Area of interest (Rectangle) mode
Use Area of interest (Rectangle) mode to draw a rectangle that defines an area containing the data you want to extract.
Only vectors, marks and parcels that fall wholly within the area defined will be extracted.
Select Area of interest (Rectangle). Your cursor will gain a pink dot, indicating its ready to draw.
Create a rectangle by left-clicking the mouse. Drag the mouse until the rectangle covers the area you need.

Click the mouse again to complete the rectangle. Complete the polygon by double-clicking the left mouse button. The Survey data extraction panel expands to show the extract options:
- Extract type
- Extract Coordinate System
- Extract data button.
See Extract options


Clear selection
You can delete and redraw the rectangle by selecting the Clear selection icon (rubbish bin) beside the Area defined label. This removes the rectangle from the screen in preparation for a new rectangle to be created.

If the area you define is too large, you will get an error. Clear selection and redraw the rectangle to cover a smaller area.

Extract options and extract data
Once you have added survey plans or defined an area, select your extract type and coordinate system.
Extract type
Select All (Marks, vectors, parcels) to extract all available survey data. For Area of interest (Polygon) or (Rectangle) modes:
- marks and parcels that are wholly within the polygon or rectangle will be extracted.
- vectors that are wholly within or pass through the polygon or rectangle, will be extracted.
Select Marks only to extract just the survey marks from the added survey plans, or the marks that are wholly within the defined polygon or rectangle.

Extract Coordinate System
This is set to NZGD 2000 by default.
You can change this to any of the current NZGD 1949 or NZGD 2000 survey datums by clicking into this field. Either scroll to the required coordinate system, or start typing in the field to search it.

Old Cadastral Datums are not available.
Extract Data
When you have selected your extract options, click Extract data to begin the data extraction process.

Once the extraction is complete, the survey data will be available as an XML file in the Downloads folder of your computer.
