
In Web Search, you can generate a fees report by:
- Date range for a specific user, or for all users at the firm – up to 1 year
- Transaction ID, also known as Dealing ID – for all time.
You can also filter by a specific client reference.
You can view the fees report on-screen, and download or export the fees report and print it.
Any fees shown as draft are pending, but subject to further processing. For example, this may include lodgement fees subject to registration, or fees that have yet to process by our fees batch routine. That includes the identification and removal of duplicate fees.
Web Search also allows you to quickly view your current day’s search spend for a specific client reference without generating a full fees report. See:
View today’s spend in Web Search
Open fees report and choose a firm
Open the main menu and select Fees report.

The Fees report page opens for the firm you are currently logged in under.

To run a fees report for another firm you are associated to, select your name in the header, then select the firm. This will also update the current firm you are logged into for Web Search, and any other Landonline applications.

The Fees report page will update to the current firm name and associated users.


Generate fees report by date range
You can generate a fees report for a date range up to 1 year.
You can filter this by:
- a specific user at your firm
- all users at your firm
- client reference.
Select Date range.

Click in the Date range field to select the date range. Use the arrows to change the month(s) if required, and select the from and to dates by clicking on the dates in the calendar.

As you select your from and to dates, the date range field updates to reflect your selection, and the selected dates are shown green in the calendar.

Select Apply once you have entered the required dates.

User is set to All users by default. This will show all fees incurred for your firm during the date range, by any user.

Click into the User field to select a specific user at your firm. The fees report will then only show fees incurred by that user for the selected dates.

Enter a Client reference to filter by client reference. This field is free-text, and case sensitive. Leave it blank to return results for all client references.

To include zero-charge items, tick Include $0 items. This will include any free or already paid for items on the fees report.
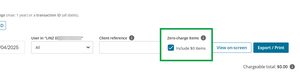
Once you have selected the date range, and any other filters you need, select View on-screen or Export / Print to generate the fees report.

For more details, see below:
View or download fees report


Generate fees report by transaction ID
You can generate a fees report by a transaction ID. This can also be referred to as Dealing ID.
This will return all matching fees incurred by any users at your firm. You can’t filter by user, but can filter this by client reference if needed.
Select Transaction ID.

Enter a transaction ID in the Transaction ID field.

Enter a Client reference to filter by client reference. This field is free-text, and case sensitive. Leave it blank to return results for all client references for the transaction ID.


To search a specific client reference for multiple transactions, return to Generate report by date range.
To include zero-charge items, tick Include $0 items. This will include any free or already paid for items on the fees report.

Once you have entered a transaction ID, and any other filters you need, select View on-screen or Export / Print to generate the fees report.

For more details, see below:
View or download fees report


View or download fees report
Once you have selected your criteria for the fees report, to generate the report select:
- View on-screen to view the fees report in a table on the web page
- Export / Print to download the report as a PDF or CSV file, then print if needed.
You can also view a fees report on-screen then export it or download it for printing.
If the fees report doesn’t show any data, or you think you are missing data, you could:
- try using fewer filters
- apply a wider date range
- check the spelling of the client reference
- confirm you are currently logged in under the correct firm.
View on-screen
Select View-on-screen to view the fees report in a table on the webpage.

For a large report, this may extend over several pages. Use the page navigation at the top of the report to see the next page.

If you update the fees report filters:
If you change any of the selection details you will need to select View on-screen again to update the results in the table.
Export / print
Select Export / Print to open the download options for the fees report. You will see your selected filters in this panel.

Choose between:
- PDF – best format for printing
- CSV – best format for a spreadsheet.
Select Download.

You will see a pop-up message at the top right of the screen advising you that the fees report is being generated.

Do not close Landonline while the fees report is generating
Generating the fees report may take some time. You can keep working in Landonline while this is generating, for example return to Web Search via the home icon, but don’t close out of Landonline or refresh your browser until it is complete.
Once the report has downloaded, you will briefly see a message at the top right of your screen: ‘Fees report generated’.

The fees report will be available as a PDF or CSV in the Downloads folder of your computer. You can then print or work with the data as needed.
The PDF version of the fees report also lists the filters you selected in the header.
