Secondary and Tertiary Centreline vectors
Centreline easements often comprise multiple vectors. You can capture these as one centreline “parcel". When you select multiple vectors for a centreline parcel, Landonline keeps this combination of vectors for ease of parcel linking.
Break up vector combinations to change the number of vectors
If you decide the centreline easement then needs more – or fewer – vectors:
- unlink the centreline parcel
- break this combination up
- reselect relevant vectors.
When you unlink a centreline parcel and then select one vector again
In the situation where:
- you used multiple vectors to create a centreline easement parcel
- you then unlinked that parcel
Landonline still holds those vectors together. You will need to separate the vectors if you want to use them again.
Create a centreline easement with multiple vectors
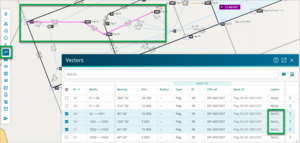
1. Open the Vectors panel on the left-hand side.
2. Add the multiple vectors for the centreline easement. The Layer fields for the vectors should be either all Secondary centreline (SecCL) or all Tertiary centreline (TerCL), to match the layer of the intended easement parcel.
3. Open the New Parcels panel.
4. Select + Add new parcel.
5. Create a new parcel with the Intent of Easement and Layer of SecCL or TerCL. This example uses a SecCL layer. Add and edit new parcel
A centreline easement is captured as a “parcel”. The appellation will begin with “Area”.

6. For the parcel you’ve just created, select the 3-dot menu in the New parcels panel.
7. Select Link. This begins the parcel linking process for the centreline easement.

When you select Link , all the available SecCL vectors are displayed as red solid lines – see below.
To select multiple vectors to add to your secondary centreline easement parcel:
- hold down the CTRL key
- left-click each SecCL vector you require. In the example it's a, b and c.
8. Select Link Parcel at the bottom right when you’ve selected all required vectors.

The parcel label appears at the midpoint of the selected lines (polyline). See label C in the screenshot below.

Multiple vectors when a centreline parcel has been unlinked
Unlink a centreline parcel by using the 3-dot menu in the Parcels panel – the same as unlinking a spatial parcel.

Separate the vectors so you can select them individually again
You need to separate the group of vectors so you can re-select the vectors individually again.
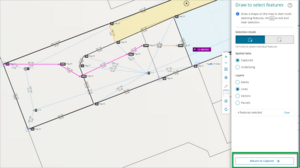
1. Select Draw to select features from the right-hand toolbar.
2. Select Lines from the Layers options.

3. Select the centreline parcel boundary lines by left-clicking at points around the outside of all the lines. The lines will be highlighted pink to indicate they’re selected.

4. Select Return to Capture at the bottom of the Draw to select features panel.

5. Right-click on one of the centreline boundary lines.
6. Select Delete lines.

When you link the centreline parcel again, the vectors will now be available to select individually.
