Searching for content
To find specific content in New Landonline support, run a Google search with the words "new landonline support [words you want to find]", e.g. New Landonline support process balance parcel.
The content you need should be near the top of the results list.
Working between Legacy and New Landonline
A survey will be locked in the following scenarios:
- where a user has opened a survey in the new Survey application first the survey will be locked in Legacy Landonline
- where a user has opened a survey in Legacy Landonline first the survey will be locked in the new Survey application
- where a user opens a survey in the new Survey application the survey will be locked so that no other user can work on the survey at the same time.
To release a locked survey, use the “Back to MyWork” button. Be careful NOT to select the browser back button as this could cause the survey to be locked for 20 minutes.

Column visibility button, Column dragging, width, etc
Using the Column visibility button you are able to turn off and on columns. The column visibility settings will remain even when the panel is closed and re-opened.
In the panels with columns, you are able to re-order the columns by dragging them with your cursor. You can also change the width of the columns. The column order will be reset when the panel is closed and re-opened.

Automatic mark linking
You can automatically link captured marks to existing Landonline marks. The automatic linking process attempts to link all captured marks not yet linked, by searching the space surrounding the captured mark. The extent of the search made is dictated by the spatial tolerance.
You can find the automatic mark linking icon next to the search bar in the Marks panel.
- manually link two or more marks to generally align the survey to existing Landonline information before using automatic linking; and
- choose the smallest appropriate tolerance to begin automatic linking and progressively increase the tolerance level to ensure correct mark links are achieved.

Manually changing CSD reference in the Marks panel
If you have imported a LandXML with the incorrect CSD reference, the Marks panel will show an orange warning triangle for new marks.
- To change the CSD reference for those marks, select them and change the State to New. This will force the CSD reference to update the current new CSD reference.
You can also change the CSD reference by manually typing the new CSD reference into the CSD reference field. When you start typing the CSD reference, a list will appear with suggested CSD references based on the typed content. When you finish typing in the new plan reference, the list will usually show one option being the new CSD reference but with LT as the plan type.
Please don't select the above option
- If you do, the CSD reference field will update to the LT reference but will still show an orange warning triangle with the pop-up message stating “For LT CSDs, new mark names should have the prefix of DP”.
- Instead hit Enter or Tab to select the manually entered DP reference. This will accept the manually typed DP reference.

Adoptions with multiple bearing adjustments/corrections to the one plan
- Include the plan reference as a referenced CSD under the Survey details panel, Referenced CSDs tab, including the most common bearing correction for that dataset.
- For each vector adopted from that dataset, that bearing correction will automatically be added to the bearing correction field.
Manually amend the bearing correction for the individual vector as appropriate.
If you go back and manually select the bearing source plan, the bearing correction will automatically be updated to the bearing correction listed in the Referenced CSD tab.

Zooming in to an area in spatial view
You have two ways of zooming in to an area in spatial view.
Use your Shift key and mouse
Hold down the Shift key on your keyboard and then click and drag your mouse to draw a rectangle around the area in spatial view you want to zoom in on.
When you release your mouse, spatial view will zoom to the area you have drawn.

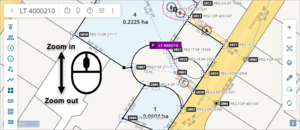
Use the scroll wheel on the mouse
Place your mouse cursor over the area you want to zoom in to and use the scroll wheel on the mouse to either zoom in or out.
