
Create package
To create a package:
- open the Work item you want to add the package to
- select + Create.

A new screen opens which shows your new package and allows you to edit it.
Edit a new or existing package
Add a certificate to a package
To add a certificate to a package either:
- select the + beside the certificate’s name – this adds the certificate to the Package certificates column
- or select the certificate from the right-hand column: click anywhere on it, hold your mouse button down, and drag the certificate into the left-hand Package certificates column.
Certificates that you can’t add again are greyed out.
Re-order certificates within a package
To reorder certificates:
- click anywhere on the certificate
- hold your mouse button down and drag the certificate to the desired position in the list.
Delete a certificate from a package
- Hover over the certificate you want to delete.
- An x will appear on the certificate’s right-hand side.
Select the x to delete the certificate.
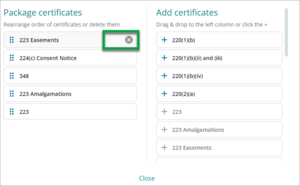

The certificate will disappear from Package certificates.
Rename a package
By default new packages are given a number as their name, e.g. Package 1. Each new package you create is assigned the next number in sequence.
To rename a package:
- select the package in the left-hand side of the screen
- select Edit package at the bottom of the right-hand side of the screen
- an Edit package pop-up box opens.

You can change the package’s name by typing over the current name (a).
Once you’ve changed its name, select Close. This saves and closes the package.

If a package has been signed, it must be Unsigned before you can change it.
Delete a package
To delete a package:
- select the package in the left-hand side of the screen
- select Delete package at the bottom of the screen.

A Delete package pop-up box opens.
Select Delete if you’re sure you want to delete it. Otherwise select Cancel.

Edit a certificate
Edit text and date fields on a certificate
The fields you’ll see vary according to the certificate.
Most certificates don't have a date field.
- Select Edit beside the text field you want to edit.

- A pop-up box appears. You can amend or delete the contents, and add new text.

- Select Enter or select outside the pop-up box to save your changes.
Changes will appear on the certificate and in the certificate preview.
There’s a limit of 180 characters for these fields.
Change date on a certificate
- Select change date.
You can select the date field and change the date manually

You can also select the date picker – at the bottom right.

A calendar opens.
- Select Today – or navigate to and select the date you want.

If you selected Today, the certificate will display today's date (example for 16 September 2024).

Complete a certificate
- Select the package the certificate belongs to.
- If the certificate isn’t already open, select the certificate on the right-hand side of the screen to open it.

- Select Mark as completed

The certificate will be completed. You'll see:
- a white tick in a dark circle beside the certificate number on the left and right panels
- no edit buttons
- Edit certificate at the foot of the certificate.
If you need to make changes to the certificate
Select Edit certificate to edit the certificate. This puts it back into Edit mode. Select Mark as complete when you've made your changes.
