Change your contact details and preferences
In Workspace:
Click ID ('Users') icon to display the Maintain User screen.

- Change your contact details as required in the Contact details tab.
- Select the Preferences tab and change your preferences as required:
- Select Yes or No in the Warning of Lodgement Fee Charge area.
- It is recommended the default setting of Yes remains unchanged.
- Select where notices will be sent in the Destination of Notices field (ie Firm or User).
- Select whether to request search products in the Display Post Registration Search area (when submitting e-dealings).
- Select your preferred Notifications Medium (eg, Fax, email).
- Select your default Land District and LINZ office.
- Select the firm and name of your preferred Conveyancing Professional if you are a Primary Contact in a conveyancing firm (Conveyancing only).
- Select Yes or No in the Warning of Lodgement Fee Charge area.
Note:
Your contact details must support your preferred notifications medium.
Change user details
System Managers can change contact details or preferences for users associated to their own Landonline account.
- Display the Maintain User screen:
Click 'External System Administration' icon to display the External System Administration screen.

- Select User | Maintain User... to display the Maintain User screen.
- Search to display the user's details:
Click 'Search' to display the External Search screen.

- Enter the search criteria, search and select the user from Search Results.
- Select the Contact Details tab:
- Change the user's details as required.
- Select the Preferences tab:
- Change the user's preferences as required.
Change firm details
System Managers can change details for their own firm.
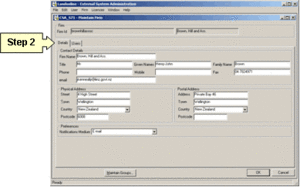
- Display the Maintain Firm screen:
Click 'External System Administration' icon to display the External System Administration screen.

- Select Firm | Maintain Firm... to display the Maintain Firm screen.
- Select the Details tab.
- Change the firm's details as required
Change account related settings for a user
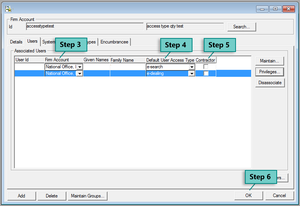
System Managers can change the users' branch office and their default user access type.
- Display the Maintain Firm screen.
- Select the Users tab.
- Select a new branch from the Firm Office drop down list to associate a user with another office in your firm.
- Select a different user type from the Default User Access Type drop down list.
- If applicable, select the Contractor check box.
- Click OK to save and close.
Change a user's privileges
Privileges allow a user access to specific functions in Landonline.
- Display the Maintain Firm screen.
- Select the Users tab.
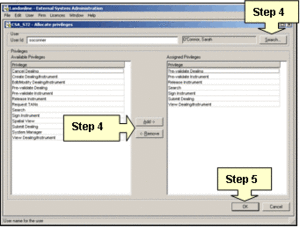
Select the user and click 'Privileges' to display privileges for the user in the Allocate Privileges screen.

- Add or remove privileges for the user:
Select Available Privileges and click 'Add' to allocate them to the user.

Select Assigned Privileges and click 'Remove' to remove them from the user.

Click 'OK' to save the user's privileges and close the Allocate Privileges screen.

Info:
To select multiple privileges for a user, hold Ctrl and click each privilege required.
Create privilege groups
Groups allow you to manage the assignment of privileges without having to assign privileges to individual users.
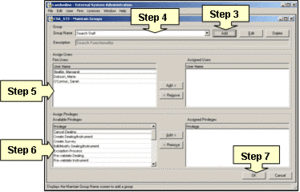
- Display the Maintain Firm screen.
Click 'Maintain groups' to display the Maintain Groups screen.

Click 'Add' to open the Maintain Group Name screen:

Enter a name and description for the group and click 'OK' to save the group and return to the Maintain Group screen.

- Select the group you created in the Group Name field.
Select Users from the Firm Users list and click 'Add' to assign users to the group.

Select privileges from the Available Privileges list and click 'Add' to assign privileges to the group.

Click 'OK' to save and close the Maintain Groups screen.

Generate a User Access Type Usage Report
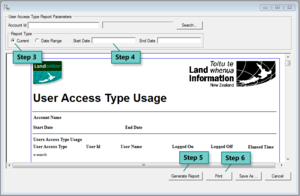
System Managers can generate a user access type usage report to show current or historic use within their Landonline account.
Click 'External System Administration' icon to display the External System Administration screen.

- Select User Access | User Access Type Usage Report.
- Click Current or Date Range.
- Enter the Start Date and End Date if applicable.
- Click Generate Report
- Print or save the User Access Type Usage Report:
- Click Print to print the report.
- Click Save as to save the report to a location on your computer.
